


ES Lint is a linting tool for JavaScript code. The term “linting” refers to the process of analyzing code for potential errors, stylistic issues, and other problems. ES Lint focuses on identifying and fixing issues in JavaScript code.
Prettier is a code formatting tool that formats code to ensure consistency and readability. It supports various programming languages beyond JavaScript, making it a versatile tool for maintaining consistent code formatting across different codebases.
Why use ES Lint and Prettier?
ES Lint and Prettier, when used together, help maintain readable and high-quality code.
ES Lint identifies and fixes potential bugs and code issues, reducing the likelihood of runtime errors.
Prettier formats code to improve readability.
ES Lint enforces a consistent coding style, ensuring all team members follow the same convention.
Enforcing coding standards and formatting rules makes maintaining and updating codebases easier over time.
Automated formatting with Prettier and static analysis with ESLint streamline development, saving time and reducing manual code review efforts.
Standard code styling fosters collaboration by minimizing debates over formatting preferences.
Integrating ESLint and Prettier in Visual Studio Code Editor
Integrating ESLint and Prettier in an Editor helps enhance your development workflow by providing real-time linting and formatting feedback within your IDE.
Firstly, Open VS Code.
Go to the extensions view (you can use Ctrl+Shift+X on Windows/Linux or Cmd+Shift+X on macOS).
Search for the following extensions: ESLint and Prettier-Codeformatter and install it.
Now that the extensions are set up, the next step is configuring the VS Code settings to optimize your workflow.
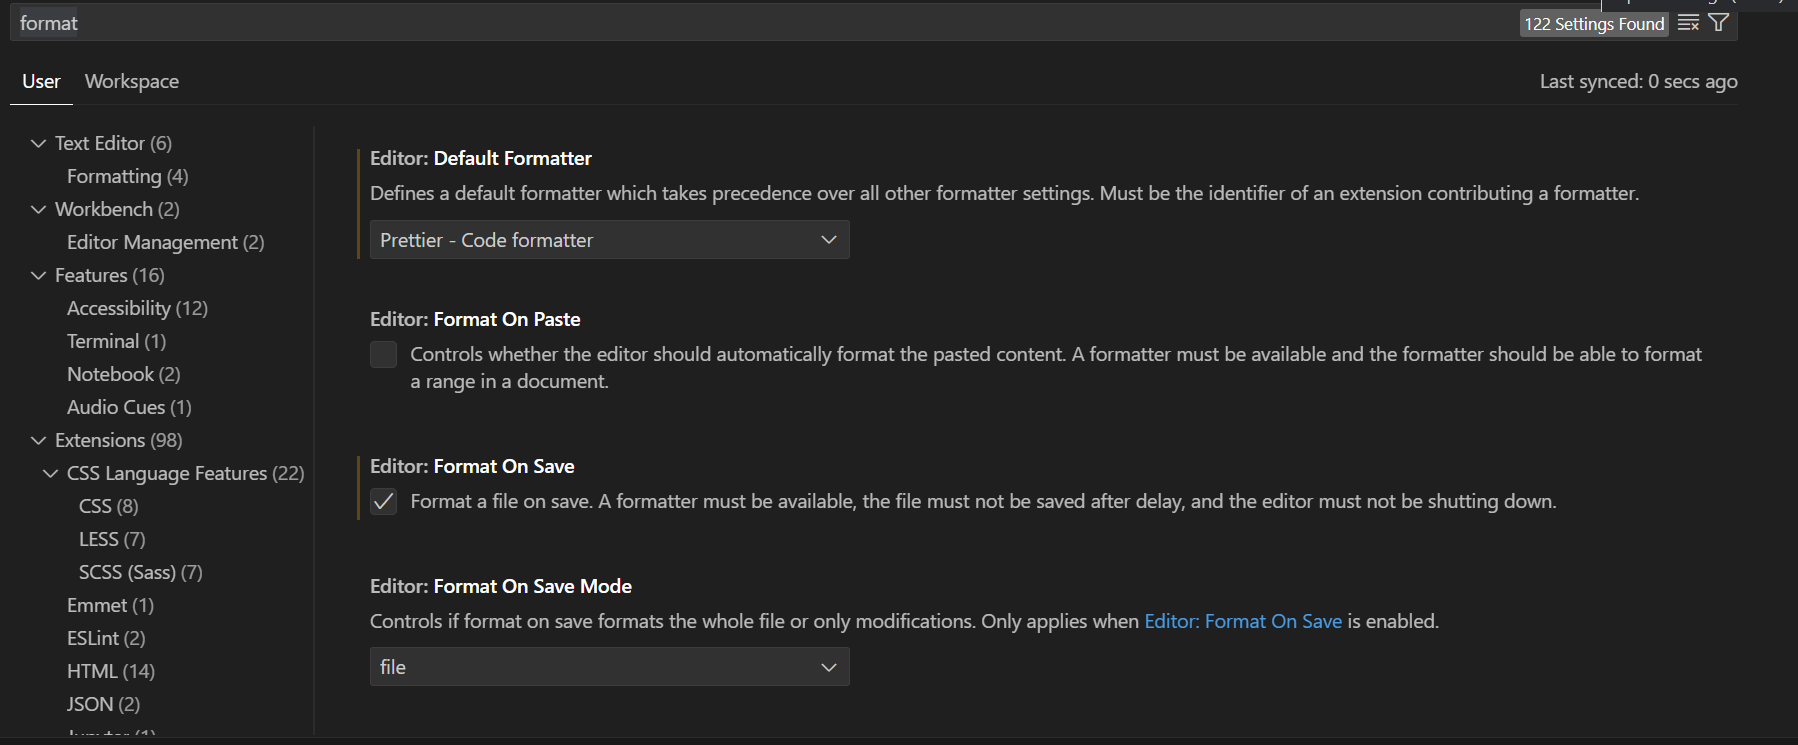
For Prettier, make it your default formatter and set it to format on save. You can do this by adding the following lines of code to your VS Code settings:
{
  "editor.defaultFormatter": "esbenp.prettier-vscode",
  "editor.formatOnSave": true
}
This is how your settings should look like after configuration:
ESLint extension integrates with ESLint for real-time linting and code analysis, but to enable this, ESLint must be installed in your project.
To use this tool, let’s proceed with Installing ESLint in a project.
Installing ESLint in a Project
Before you begin, ensure that you have Node.js installed in your development environment.
In the terminal, navigate to your project directory and execute the following command to install ESLint as a local dependency:
npm install eslint --save-dev
Alternatively, install ESLint globally using the -g (global) flag;. In contrast, global installation can be convenient, it’s often recommended to install ESLint locally for each project to ensure version consistency and avoid potential conflicts between different projects.
Configuring ESLint
Configuring ESLint involves customizing the rules and settings according to the specific requirements of your project. To achieve this, you must create an ESLint configuration file, .eslintrc.
You can generate a basic ESLint configuration file using the following command:
npx eslint --init
This command initializes configuration through a series of wizard prompts. The prompts help you customize your ESLint configuration based on your project’s needs. These prompts may include:
How would you like to use ESLint? This question asks about the primary use case for ESLint. Options include:
To check syntax only
To check syntax and find problems
To check syntax, find problems, and enforce code style
What type of modules does your project use? Choose the module system your project uses. Options include:
JavaScript modules (import/export)
CommonJS (require/exports)
None of these
Which framework does your project use? Select the framework your project is based on. Options include:
React
Vue.js
None of these
Does your project use TypeScript? » No / Yes Select the right option based on the kind of project you are working on.
Where does your code run? Specify where your code runs. Options include:
Browser
Node
How would you like to define your style? Choose a popular style guide or define your style. Options include:
Use a popular style guide
Answer questions about your style
Inspect your JavaScript file(s)
What format do you want your config file to be in? Choose the format for your ESLint configuration file. Options include:
JavaScript
YAML
JSON
If you choose to use a popular style guide (more on this later), ESLint may offer to install the necessary dependencies using npm.
If you opt to answer questions about your style, ESLint will prompt you with a series of inquiries regarding your code style preferences. The questions cover aspects such as indentation, single or double quotes, line endings, and semicolons.
After answering these questions, ESLint will generate the appropriate configuration file based on your selections.
Linting and Fixing a File:
Once ESLint is configured, ESLint will automatically analyze the code and report any errors or warnings based on your configuration.
Alternatively, use the following command to lint your file from the command line:
npx eslint your-file.js
Replace your-file.js with the actual name of your JavaScript file.
To automatically fix the detected issues or errors, ESLint provides a helpful command:
npx eslint --fix your-file.js
The --fix flag is used to automatically resolve fixable linting issues. However, it’s important to note that not all linting issues are fixable, and certain rules cannot be automatically addressed by the --fix flag. It’s crucial to manually handle non-fixable issues in adherence to ESLint rules and guidelines.
Extending ESLint
Extending ESLint involves going beyond basic configurations to tailor ESLint to suit the unique requirements of your projects. This is done through plugins, presets, and other tools.
Let’s explore these tools and customize ESLint to align with the specific needs of your projects.
Introduction to Eslint Plugins
ESLint plugins extend ESLint’s functionality by providing custom rules, processors, or other features. When we say “extend Eslint’s functionality”, we mean the ability to enhance or add new features to ESLint beyond its default capabilities.
ESLint plugins follow a naming convention that includes the eslint-plugin- prefix. The general naming convention for ESLint plugins is eslint-plugin-<name>.
When integrating plugins into an ESLint configuration file, you can omit the eslint-plugin- prefix. The plugin name or ID becomes the key identifier.
You can install a plugin from the npm registry or publish a custom plugin, thereby contributing to the development community. Let’s delve into the process of creating a custom plugin.
Creating a Shareable ESLint Plugin using Yeoman
ESLint plugins are separate npm packages that can be developed independently of any specific project. It’s common to create plugins in their dedicated repositories or directories and then publish them as npm packages for broader use. Creating a plugin allows sharing your custom linting rules and configurations.
Yeoman is a versatile tool designed to kickstart projects using predefined templates. To create an ESLint plugin, use the ESLint generator provided by Yeoman.
To use Yeoman, you must first of all install it globally using the following command:
npm i -g yo
Now that you have Yeoman installed let’s run the following command to install the ESLint plugin generator:
npm i -g generator-eslint
Create a directory to house the plugin, following a proper naming convention, and navigate to it in your terminal using the following commands:
mkdir eslint-plugin-sample
cd eslint-plugin-sample
Generate an ESLint plugin using Yeoman by running this command:
yo eslint:plugin
You will be prompted to provide information about your plugin. These prompts include:
Your name: Provide your name or username for author information.
Plugin ID: Enter a unique, lowercase name for your plugin. This identifier will be used within the plugin section of your
.eslintrcfile (e.g.,react).Description: Briefly describe the plugin’s purpose.
Contains custom ESLint rules?: Answer
Yesif you plan to create custom rules.Contains one or more processors?: Answer
Yesif you want to create processors for custom syntax or AST transformations.
Once you complete this process, you’ll have a project structure with the needed files and folders.
Files and Folders in an ESLint Plugin
The ESLint plugin houses many files and folders, which include:
lib/: This directory contains the main logic of your plugin. This is where you will find your plugin’s rules, processors, formatters, and utilities.rules/: This is where you define your custom rules. This is found inside thelib/directory (more on this later).Index.js: This file serves as an entry point where you export various components of your plugin. Depending on your plugin’s features, theindex.jsfile can export rules, config, processors, and other utilities..eslintrc: This file is the configuration file for your plugin.package.json: This file contains the metadata and dependencies of your plugin.tests/: This directory contains test files for your rules.
Sharing a Plugin Locally
After creating a plugin, the next thing to do is to publish and use your plugin in your project.
Use the following the following command to publish your plugin locally in the npm directory as a symbolic link:
npm link
This command is used for installing and publishing a plugin locally within your development environment. It is also a convenient way to test your plugin locally during development.
Installing a local plugin in a Project
In the project directory where you want to use the local version of the plugin, run the following command:
npm link eslint-plugin-sample
This links the plugin to your project as a symbolic link. You can check if your plugin has successfully been linked using the following command:
ls node_modules/eslint-plugin-sample
Replace sample with your actual plugin ID.
Publishing an ESLint Plugin Online
Publishing an ESLint plugin to the npm registry involves a series of steps to make your plugin available for others to install and use. To achieve this, ensure that you have an npm account; if you don’t, you can create an account on the npm website.
- Now, on the plugin’s root directory, run the following command to log in to your npm account:
npm login
- Run the following command to publish your plugin:
npm publish
- Now that you have published your plugin, you can simply go to the npm official website to verify and update your plugin’s documentation.
ESLint Rules
ESLint rules define how code should be written, including patterns and practices to follow or avoid. The official documentation is the comprehensive resource listing all available rules. You can customize ESLint’s behavior by adding rules to your ESLint configuration file. This allows you to override specific rules that are currently active or define new rules to tailor ESLint to your project’s requirements.
Creating Custom Rules
Creating a custom rule involves defining a specific coding convention or pattern you want to enforce in your codebase. Custom rules help enforce project-specific coding conventions not covered by the existing rules.
To create a custom rule, you must understand the term “Abstract Syntax Tree(AST)”.
AST is a hierarchical structure that represents the syntactic structure of your code. When ESLint analyzes your JavaScript code, it doesn’t work directly with the text but instead creates a tree-like structure called the AST. Each node in the tree corresponds to a different part of your code, such as variables, functions, or expressions.
ESLint uses parsers like Espree to convert raw code into a comprehensible AST.
AST Explorer is an online platform to visually explore and analyze Abstract Syntax Trees. AST Explorer provides a comprehensive interface for delving into the intricacies of Abstract Syntax Trees, offering a valuable resource for understanding code structures.
Below is an image of the interface of AST Explorer:
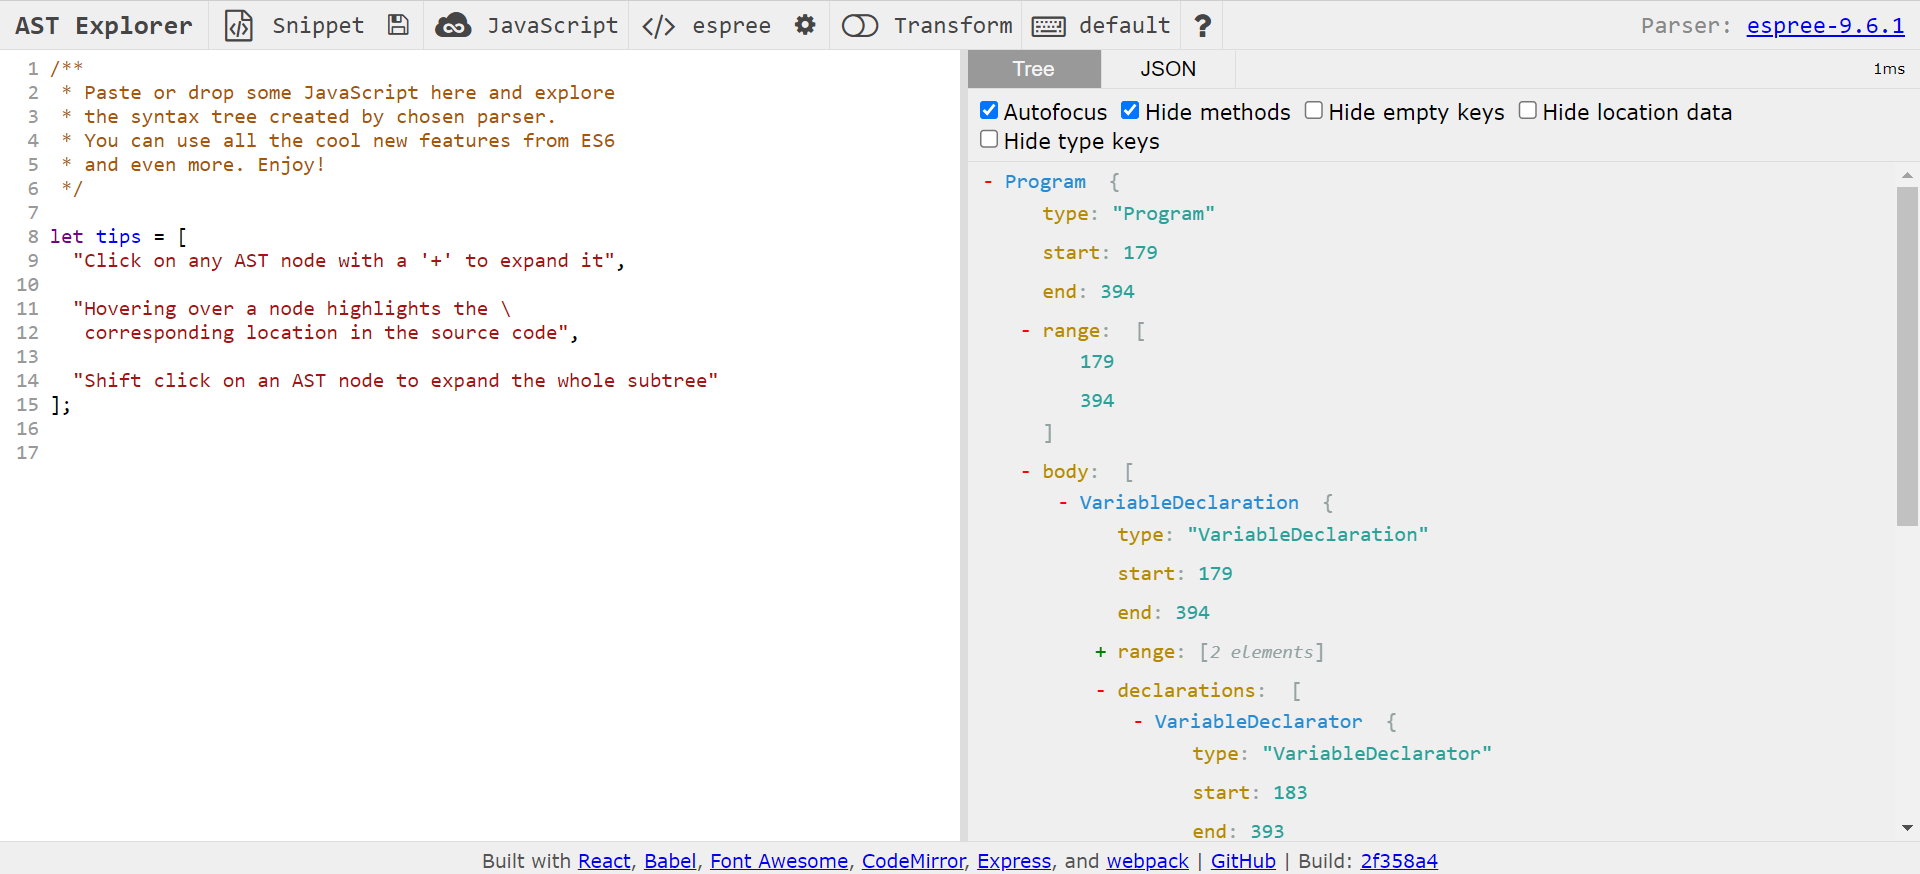
As seen in the image, you can select the parser that matches the one ESLint uses. Write a sample code snippet in the editor on the left. As you write the code, the AST Explorer updates in real-time, displaying the corresponding AST nodes on the right side. You can click on different parts of your code to see the corresponding AST nodes highlighted. You can use AST Explorer to generate the corresponding code once you identify the relevant AST nodes for your custom rule.
Creating a Custom Rule inside a Plugin Structure
In your plugin directory, navigate to the lib/rules directory and create a file for your custom rule. Let’s name this file custom-rule.js. By placing your custom rule file within this directory, you are essentially bundling your custom rule in a plugin.
To create a custom rule, you must first define the metadata of the rule. You must include the meta property in the rule file to define metadata. This includes information such as the rule’s name, category, description, and other configuration options it may support.
For example :
module.exports = {
  meta: {
    type: "layout", // Indicates the type of the rule (e.g., 'layout', 'suggestion', 'problem')
    fixable: "whitespace", // Specifies if the rule is fixable and the type of fix (e.g., 'whitespace', 'code')
    // Other metadata properties can be added as needed
  },
  schema: [
    // Define options that can be configured for your custom rule
  ],
  // Rule logic follows...
};
After defining the metadata, the next step is to define the rule logic. This involves specifying the conditions under which the rule should trigger and the actions it should take when it identifies a violation.
Let’s create a custom rule logic that checks the length of variable names:
module.exports = {
  meta: {
    type: "layout",
    fixable: "whitespace",
    schema: [
      {
        type: "object",
        properties: {
          max: {
            type: "number",
            minimum: 1,
          },
        },
        additionalProperties: false,
      },
    ],
    messages: {
      variableNameTooLong:
        'Variable name "{{name}}" exceeds the maximum length of {{maxVariableNameLength}}.',
    },
  },
  create(context) {
    const { max: maxVariableNameLength = 20 } = context.options[0] || {};

    return {
      Identifier(node) {
        const { name } = node;
        if (name.length > maxVariableNameLength) {
          const shorten = name.substring(0, maxVariableNameLength);
          context.report({
            node,
            messageId: "variableNameTooLong",
            data: { name, maxVariableNameLength },
            fix: (fixer) => fixer.replaceText(node, shorten),
          });
        }
      },
    };
  },
};
Let’s Break Down the Rule file: The create method:
- This is the entry point for the rule logic. Destructures
context.options[0]to extract the configured max value for variable name length or defaults to 20 if not provided.
Parsing Configuration Object:
- The
schemaproperty in themetaobject defines the expected structure of the configuration object. In this example, it expects an object with a max property, representing the maximum allowed variable name length.
Listener (Identifier):
- Listens for Identifier nodes in the AST (Abstract Syntax Tree). It checks if the length of the variable name exceeds the configured maximum value. If the check fails, it reports an issue with a custom error message and provides a fix function to automatically shorten the variable name.
Fixable Rule:
- Set the
fixableproperty in themetaobject to make the rule fixable. Implement thefixfunction insidecontext.reportto fix an issue automatically.
Link or Publish the Custom Rule through a Plugin:
Decide whether to link the plugin locally or publish it to the npm registry. For detailed instructions on how to link or publish a plugin to npm, please revisit the Plugin section where this process is elaborated.
Next, install the plugin in the project where you want to use your custom rule.
Usage: Add sample to the plugins section of your .eslintrc configuration file.
{
  "plugins": ["sample"]
}
Then, configure the custom rules you want to use under the rules section.
{
  "rules": {
    "sample/custom-rule": ["error", { "max": 10 }]
  }
}
Now, set up test files in your project that include instances of the code you want your rule to catch.
If your custom rule works perfectly and you want to share it with the community, consider publishing the plugin to the npm registry.
ESLint Presets
ESLint presets are predefined configurations that help enforce coding standards and maintain consistent code across projects. When you use presets, you essentially adopt a style guide that aligns with your coding preferences or follows established best practices.
ESLint presets, similar to plugins, follow a naming convention that includes the eslint-config- prefix. The general naming convention for ESLint presets is eslint-config-<name>.
When integrating presets into an ESLint configuration file, you can omit the eslint-config- prefix.
Similar to plugins, you can install a plugin from the npm registry or create a custom plugin and publish it. Let’s explore some of the popular presets available in the npm registry.
Popular Style Guides
Some Popular style guides or presets include:
- ESLint Recommended: The default configuration with the basic rule set. It is a good starting point for customization.
Package:
eslint-config-eslintInstallation:npm i eslint-config-eslintUsage:{ "extends": " eslint:recommended " }
- Airbnb JavaScript Style Guide: Widely used with a focus on modern JavaScript and best practices, offering variations for different environments.
Package:
eslint-config-airbnbInstallation:npm i eslint-config-airbnb-baseUsage:{ "extends": "airbnb" }
- Standard Style: A strict, opinionated preset for clean, readable JavaScript.
Package:
eslint-config-standardInstallation:npm i eslint-config-standardUsage:{ "extends": "standard" }
- Google JavaScript Style Guide: Used internally by Google to enforce consistent practices for large codebases.
Package:
eslint-config-googleInstallation:npm i eslint-config-googleUsage:{ "extends": "google" }
Creating Custom Shareable ESLint Presets
Configuring rules and settings for each project can become a repetitive and time-consuming task. Custom ESLint presets offer a solution by allowing you to create a bundled configuration file that encapsulates your preferred rules or settings, ensuring consistency across projects.
Unlike plugins, presets do not bundle custom rules. Instead, they bundle together existing ESLint configurations into a single shareable package.
Let’s walk through the steps to create a custom preset:
- Create a new directory to house your ESLint preset project and navigate to it in your terminal using the following command:
mkdir eslint-config-example
cd eslint-config-example
- Initialize the project using npm:
npm init
This will automatically create a package.json file. Ensure that the main property in package.json points to your ESLint configuration file.
Install ESLint as a dependency in your project.
Create your main preset file, which should be a javascript configuration file, for example,
index.js. This file will define and configure rules and settings you don’t always want to repeat in each new project you create.
You can add as many settings to this config file as needed, and by sharing and extending it in your new project, you avoid repetition. This approach ensures consistency and simplifies adopting your preferred configurations across different projects.
Sharing Your Preset
Similar to the process explained earlier for sharing ESLint plugins, you can apply the same steps for sharing ESLint presets. Whether for local testing or broader distribution via the npm registry, the procedure remains consistent.
Use Your Custom Preset
This is also similar to the process explored earlier for ESLint plugins; utilizing your custom preset is equally straightforward. The steps remain consistent whether you opt for local testing or widespread distribution through the npm registry. Once you have installed your preset in your new project, the next thing to do is to extend it in your .eslintrc file:
{
  "extends": " sample-preset",
}
While ESLint plugins are added to the plugins array, ESLint presets are included in the extends array.
Installing Prettier in Your ESLint Project
Now that you’ve set up ESLint, configured it, and learned how to extend its capabilities, it’s time to enhance your project further by installing Prettier, thereby combining ESLint and Prettier to improve your codebase and provide comprehensive linting and formatting for your code. Let’s dive into the steps to install and configure Prettier in the same project:
Navigate to your project directory using the terminal and execute the following command to install Prettier as a local dependency:
npm install --save-dev prettier
Alternatively, install Prettier globally using the -g (global) flag.
Configuring Prettier
Create a .prettierrc file in the root directory of your project.
Add your desired Prettier configuration options, for example:
{
  "semi": true,
  "singleQuote": false,
  "trailingComma": "es5",
  "printWidth": 80,
  "tabWidth": 2
}
Integrating Prettier with ESLint
- Now that you have prettier and ESLint already installed in your project. Install the
eslint-plugin-prettierandconfigthat help avoid formatting conflicts using the following command:
npm install --save-dev eslint-plugin-prettier eslint-config-prettier
eslint-plugin-prettier: This package allows ESLint to run Prettier as an ESLint rule.
eslint-config-prettier: This configuration turns off all ESLint rules that might conflict with Prettier.
- Update your existing
.eslintrcfile to include Prettier rules: Firstly, addplugin:prettier/recommendedas the last item in the extends array:
{
  "extends": [ "plugin:prettier/recommended"],
}
The order of configurations in the extends array matters because Configurations listed later can override the previous configurations.
Next, add prettier to the plugins section of the configuration file:
{
  "plugins": ["prettier"]
}
Then, add the prettier/prettier rule under the rules section.
{
  "rules": {
  "prettier/prettier": "error",
  }
}
Code Transformation Before/After using ESLint and Prettier
Before:
//javascript
function generatePrimeNumbers(limit) {
  let primes = [];
  for(let i = 2; i <= limit; i++) {
  let isPrime = true;
  for(let j = 2; j < i; j++) {
      if(i%j === 0) {
        isPrime = false
        break
      }
    }
    if(isPrime) primes.push(i);
  }
  return primes
}
console.log(generatePrimeNumbers(20))
After (with ESLint and Prettier):
//javascript
function generatePrimeNumbers(limit) {
  let primes = [];
  for (let i = 2; i <= limit; i++) {
    let isPrime = true;
    for (let j = 2; j < i; j++) {
      if (i % j === 0) {
        isPrime = false;
        break;
      }
    }
    if (isPrime) primes.push(i);
  }
  return primes;
}
console.log(generatePrimeNumbers(20));
As seen in this example, if you follow this tutorial completely, Prettier will work seamlessly with ESLint, applying Prettier rules as an ESLint rule. This combination allows them to jointly identify and fix various issues in this code, such as indentation problems, missing semicolons, and inconsistent spacing around statements.
Additionally, ESLint, when configured with appropriate rules, can warn against practices like using console.log directly, providing a more comprehensive approach to code quality and maintainability.
Conclusion
The combination of ESLint and Prettier transforms code development, utilizing ESLint’s linting and Prettier’s formatting. Beyond the basics, you have learned how to extend ESL int’s functionality through plugins and presets, tailoring it to their unique project requirements. This powerful synergy not only improves code quality and readability but also establishes a foundation for collaborative development, making integrating these tools an indispensable asset in any developer’s toolkit.